How I Deployed My Node.js App on a VPS With a Custom Domain & Free SSL

I deployed my personal project PBlog to a real VPS, connected it to my custom domain pblog.online, and secured it with free HTTPS. This post documents the exact steps I followed, from a blank server to a fully production-ready app.
If you're new to VPS deployments, this guide will walk you through everything I learned along the way.
1. Creating VPS
I used Kamatera to create an Ubuntu server. Once the server was ready, I connected via SSH:
ssh root@YOUR_SERVER_IP

2. Installing Node.js and Git
sudo apt update
sudo apt install nodejs git -y
3. Cloning and running the app on a VPS
I cloned my project from GitHub and ran it on that server
git clone https://github.com/pmadhav82/P_blog.git
cd P_blog
npm install
4. Running the app with pm2
To keep the app running 24/7, I installed pm2:
sudo npm install -g pm2
started the app:
pm2 start app.js
Now the app is running on port 8000 and can be accessed by visiting publicIP:8000
5. Installing and Configuring Nginx
I installed Nginx:
sudo apt install nginx -y
Usefull Nginx Commands
| Purpose | Command |
|---|---|
| Check Nginx status | systemctl status nginx |
| Start Nginx | sudo systemctl start nginx |
| Stop Nginx | sudo systemctl stop nginx |
| Restart Nginx | sudo systemctl restart nginx |
| Reload Nginx (safe reload after config changes) | sudo systemctl reload nginx |
| Test Nginx configuration | sudo nginx -t |
| View error logs | sudo tail -f /var/log/nginx/error.log |
| List enabled sites | ls /etc/nginx/sites-enabled/ |
| List available sites | ls /etc/nginx/sites-available/ |
| Enable a site (create symlink) | sudo ln -s /etc/nginx/sites-available/yourfile.conf /etc/nginx/sites-enabled/ |
| Disable a site (remove symlink) | sudo rm /etc/nginx/sites-enabled/yourfile.conf |
At this point, visiting the server's IP address showed the default Nginx welcome page. In order to see the app when visiting the server IP, we have to remove the default Nginx site and create a reverse proxy config.
Creating Reverse Proxy Config
I created a new config file:
sudo nano /etc/nginx/sites-available/pblog.conf
Added this:
server {
    listen 80;
    server_name _;

    location / {
        proxy_pass http://localhost:8000;
        proxy_http_version 1.1;
        proxy_set_header Upgrade $http_upgrade;
        proxy_set_header Connection 'upgrade';
        proxy_set_header Host $host;
        proxy_cache_bypass $http_upgrade;
    }
}
Enabled it:
sudo ln -s /etc/nginx/sites-available/pblog.conf /etc/nginx/sites-enabled/
Tested and reloaded Nginx:
sudo nginx -t
sudo systemctl reload nginx
At this moment, visiting the server IP will show the app.
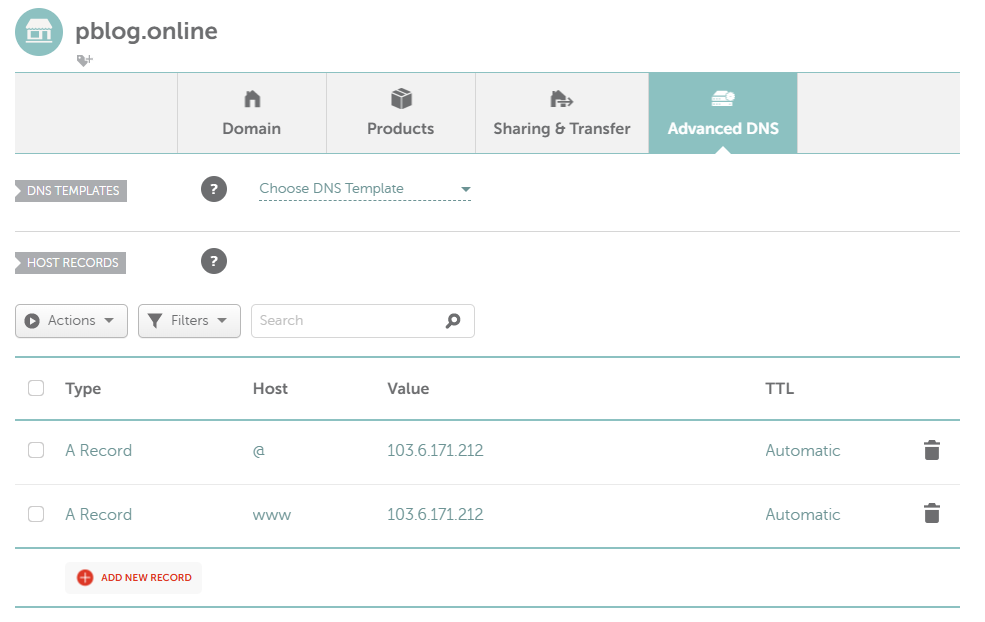
6. Connecting Domain
I bought a domain from Namecheap. Inside Namecheap -> Advanced DNS, I added two A records where the value is my server's public IP:
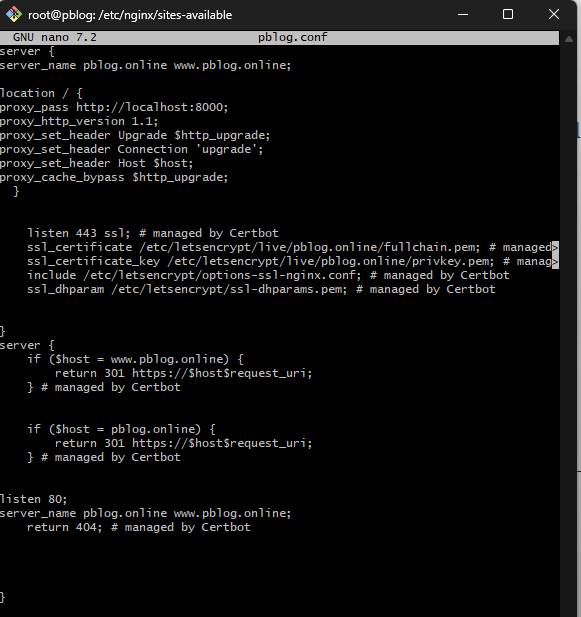
I updated the pblog.conf file.
sudo nano /etc/nginx/sites-available/pblog.conf
Updated it to:
server {
    listen 80;
    server_name pblog.online www.pblog.online;

    location / {
        proxy_pass http://localhost:8000;
        proxy_http_version 1.1;
        proxy_set_header Upgrade $http_upgrade;
        proxy_set_header Connection 'upgrade';
        proxy_set_header Host $host;
        proxy_cache_bypass $http_upgrade;
    }
}
and reloaded Nginx;
sudo systemctl reload nginx
After a few minutes, pblog.online pointed to my app, but it wasn't secured.
7. Adding Free SSL With Certbot
I installed Certbot:
sudo apt install certbot python3-certbot-nginx -y
Requested SSL:
sudo certbot --nginx -d pblog.online -d www.pblog.online
I followed the prompt and Certbot automatically:
Generated certificates
Updated my Nginx config
Reloaded Nginx
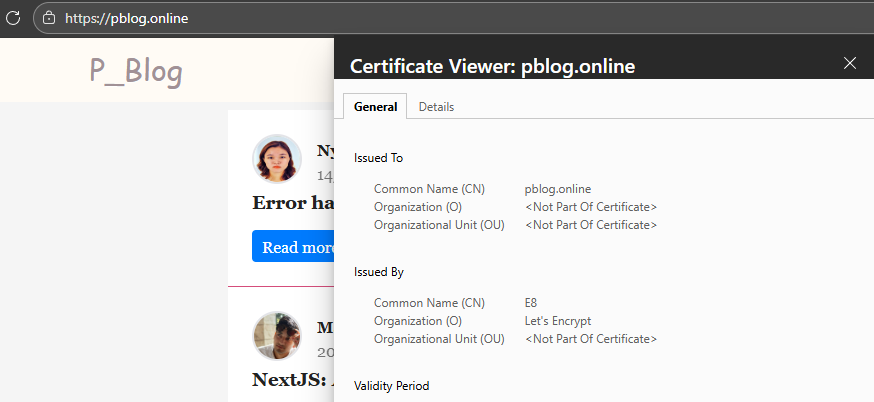
Now my site is live at:
https://pblog.online
Deploying my app to a VPS taught me a lot about:
Linux servers
Nginx reverse proxies
DNS configuration
SSL certificates
Production Node.js setups
Now my project is fully live, secure, and running on my own infrastructure.
If you're deploying your first app, I hope this guide helps you avoid the confusion I had at the beginning.